Following on from my previous post….You may already have seen my WordPress Font Pairing Preview plugin and after playing around with some of the font pairing previews you might be wondering – “how can I now apply the Google fonts to my site?”
If you want to get a bit more creative with the typography of your WordPress theme then keep reading.
The word typography originates from the ancient Greek words “typos” which means form and “graphe” which stands for writing.
Therefore typography means the arrangement of the letters and symbols on your website in order to convey language and communication. There are many attributes pertaining to the letters and symbols which you can set such as the font-family, font-type, font-size etc and all of these qualities will determine how well the words appear on your web pages.
By default there are many standard font families you can already use on your website which are optimally designed for easy readability on websites and a nice crisp style. For example, Ariel, Helvetica or sans-serif are the common ones.
There are also other font types you can choose ranging from expensive commercially licensed fonts to the freely available Google Web Fonts.
In this short tutorial I will show you how to modify your WP theme by creating a child theme so you can display any of the hundreds of font-families available in the Google Web Fonts directory.
Note: I will be using the twentyeleven theme as the basis in this example but the same principles should also apply to any theme.
So let’s get started…..
Step 1:
Somewhere on your computer create a new folder which will contain your child theme. We’ll call it new-twentyeleven.
Step 2:
Inside the new-twentyeleven folder create a new file called style.css.
Inside this new file we will define our child theme as follows:
/*

Theme Name: new-twentyeleven

Theme URI: http://enteryoursite.com/

Description: Child theme based on TwentyEleven

Author: Enter Your Name

Author URI: http://enteryoursite.com/

Template: twentyeleven

Version: 1.0

*/

@import url("../twentyeleven/style.css");

.entry-content {

font-family: "Adamina";

font-size: 16px;

line-height: 25px;

}
The comment section from lines 1 to 17 and the line immediately following it (line 19) are the minimum things required to define a WordPress “child theme”.
The child theme name is defined in the first line of the comments and the import statement on line 19 simply tells WordPress that this child theme will inherit all of the styling and display from the parent twentyeleven theme.
For example if you activate the child theme with just the code from lines 1 to 19 you will get the exact same display and behaviour as the standard twentyeleven theme.
But since the power of child themes lies in the fact that we can override the styling and functionality of the parent theme, I have also inserted the CSS code you can see in lines 21 to 29.
This code will set font-family, font-size and line-height of all the body text in each of my site’s posts. In this case for our example, I am using a font family from the Google Font Directory called “Adamina”.
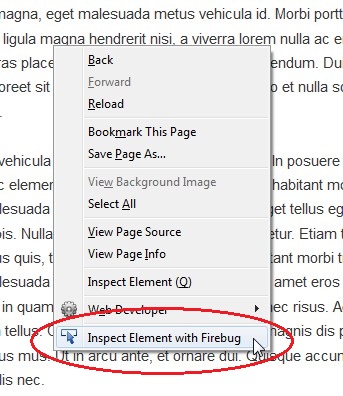
To figure out which CSS class I needed to modify from my theme in order to change the way my pages display, I used FireBug by right-clicking on the body text of one of my post pages and selecting “Inspect Element With FireBug” as shown in the figure below:

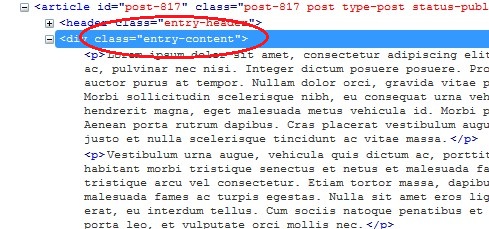
Then when the FireBug window opens you can see which CSS class you will need to specify when writing the CSS code in your child theme file (see below).

Step 3:
Now create a new file called functions.php in your child theme directory.
Place the following code inside the new functions.php file:
<?php

function add_google_fonts() {

wp_register_style('GoogleFonts', 'http://fonts.googleapis.com/css?family=Adamina');

wp_enqueue_style('GoogleFonts');

}

add_action('wp_print_styles', 'add_google_fonts');

?>
The above code uses the WP hook called “wp_print_styles” to invoke our function called “add_google_fonts” which will basically place the following html code between the <head> tags of our WP site:
<link rel='stylesheet' href='http://fonts.googleapis.com/css?family= Adamina' type='text/css' />
In other words, the above will allow us to use the new “Adamina” Google Web font on our WordPress site.
But what if I wanted to use more than one Google Font on my site?
In above example we are specifying only one Google font called “Adamina”. If you wanted to use two, three or even more Google fonts, say “Delius”, “Montaga” and “Smokum” in addition to “Adamina” you would simply modify line 5 above as follows:
wp_register_style('GoogleFonts', 'http://fonts.googleapis.com/css?family=Adamina|Delius|Montaga|Smokum');
Step 4:
So now that the child theme is ready, FTP it to the “wp-content/themes/” directory of your WordPress site.
Step 5:
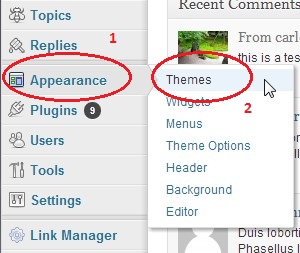
After you’ve FTP’d your child theme log into your WP administration panel and go to the themes menu as shown below:

Step 6:
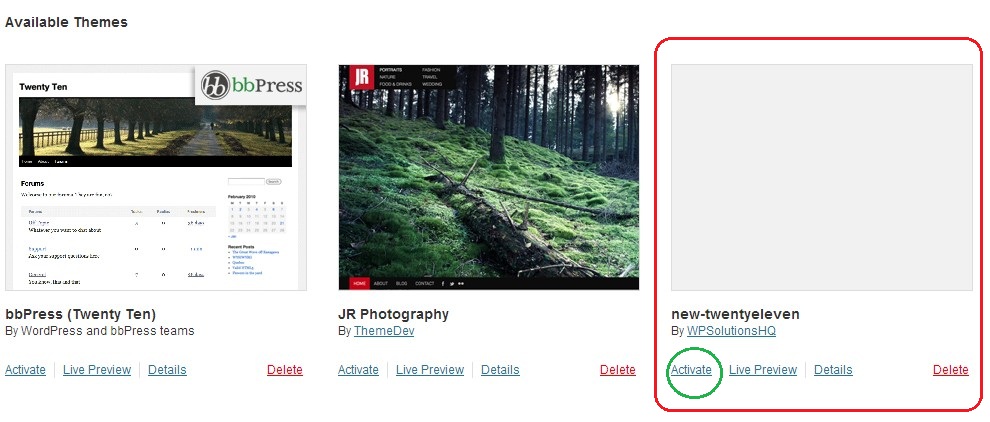
Once inside the themes window you will see your child theme displayed. Simply click on the Activate link to activate your child theme as shown below:

You have now successfully added a Google Font to your new child theme!
After activating the child theme the website will display the new Google Font called “Adamina” for all paragraph/body text.
Below is a comparison of the before and after fonts:
Original theme font – “Helvetica Neue”

New child theme font – “Adamina”

 Stuart Mansfield says
June 10, 2015 at 1:13 amWill this method work for twenty fourteen child theme? Plugins really slow down WordPress sites I try to avoid them if I can and use JQ enqueue scripts.
 Emina says
April 15, 2015 at 5:45 amI use genesis themes but don’t like its default font can i use Google fonts without using any plugin ??
 web directory software says
December 30, 2013 at 5:51 pmHi everyone again,
I was just installed the WP Google Fonts plugin for WordPress and I really like it. It’s the easy font plugin for me allowing easy access and usage of a lot of different fonts for my WordPress website. The thing I was just wondering is if the fonts will show up in every browser and computer (both Mac and PC) and will not go back to the default font or not even show at all?
If anyone has any feedback on this issue it would be much appreciated and I thank you all very much again
 Sanusi says
April 19, 2014 at 2:31 amYes is work on both Mac and PC, I just Install it on my site and it work well, the plugin is great, very easy to install and use. it also come with lot of Google font. very Resource for web Designer to make their work look professionals
 Patric says
November 17, 2013 at 4:26 amHi,
Great plug in :-)
But were should I put the file:
You wrote that the code shold be placed in WP-site, What file is that?
Best regards
Patric