 If you have a brand-spanking new plugin which you’ve recently developed and are excited about unleashing it to the world then the first thing you should probably do is to submit it and promote it on the wordpress.org site.
This post will explain how to do the submission of your plugin using the subversion repository for users of the windows operating system because the instructions given on wordpress.org assumes you have a either linux or other command line operating systems.
To submit and promote your plugin on the wordpress.org site you will need to follow a few steps which are outlined below.
Preliminary steps:
- Read the Plugin Submission and Promotion instructions.
- Sign up so that you have a developer’s account in wordpress.org.
- After following the instructions above you will eventually get an email stating that your plugin has been approved for submission.
Within this email you will get instructions about how to submit your plugin files using the subversion repository system. The instructions given will not apply to you if you are using windows. See my instructions below about how to do this using windows.
Use the following instructions to submit your plugin files using subversion for windows:
Step 1: Download and install TortoiseSVN on your windows machine.
This is a windows interface to the Subversion repository system.
Step 2: Create a directory somewhere on your hard drive which you will use as the place for your local repository. You can name it the same as your plugin name or whatever you want.
This will be directly linked to the repository hosted on wordpress.org where people can download your plugin.
The preliminary steps above would have ensured that you will have already received your own repository hosted by wordpress.org. You will receive the link to your repo in your approval email and it will look something like the following:
http://svn.wp-plugins.org/
If you click on your repository link you’ll see 3 folders as follows:
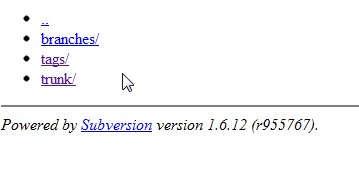
The above folders will be empty at the moment because you haven’t submitted your plugin yet.
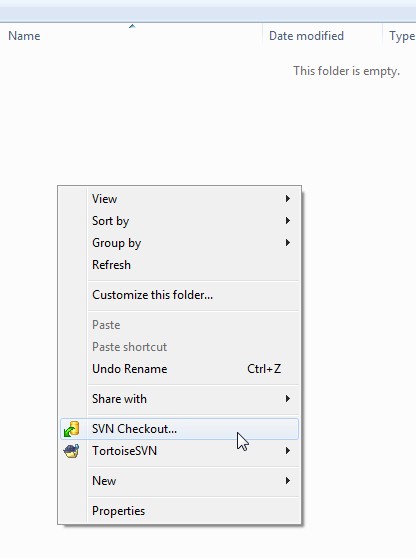
Step 3: On your computer, go to the folder you created in step 2) using windows explorer and then right-click and select “SVN Checkout” as shown below:
Step 4: You will then get a window which will ask you to specify the URL of your plugin repository. Paste the URL sent to you in your approval email in the field called “URL of repository” and as shown below:
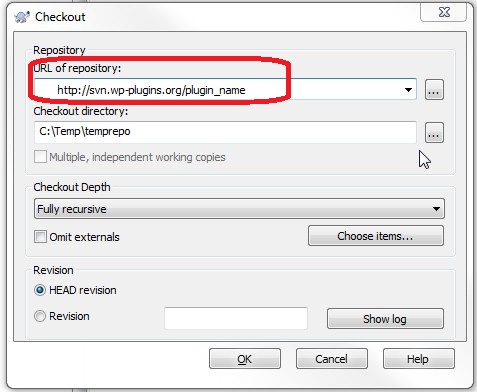
The field called “Checkout directory” should be the new folder you just created on your windows system.
Leave all other settings as they are and then click the “Ok” button.
After clicking the “Ok” button the Tortoise SVN will log into your remote repository and download the three folders we talked about in step 2).
Step 5: You should now see 3 empty folders called “branches”, “tags” and “trunk” on your computer as shown:

Now copy your plugin files and readme.txt into the trunk folder.
Step 6: After you’ve copied your plugin files right-click the trunk folder and select SVN commit:
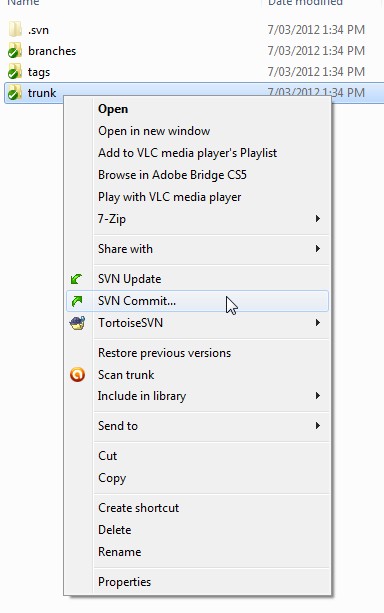
This will now upload your plugin files from your local machine to the remote wordpress.org repository.
Step 7: Ensure that your plugin files have been uploaded to the remote repository by visiting the trunk folder (http://svn.wp-plugins.org/<your_plugin_name>/trunk) and confirming that your files are there.
Step 8: Now we need to add some tag information which will tell people which is the current and stable release of your plugin.
To do this right-click the trunk folder and select TortoiseSVN->Branch/tag as shown below:

Step 9: Add the string “/tags/1.0” at the end of your plugin repo path in the “To path” field as shown below and then click “Ok”:
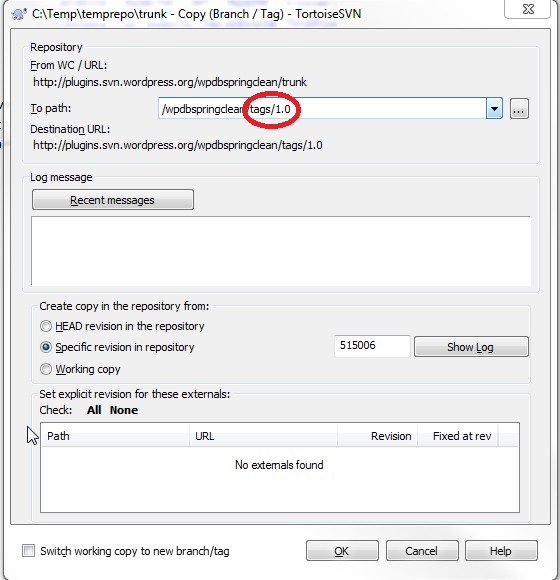
Step 10: Your local tags folder on your windows machine will currently be empty because the above step would have created the new subfolder called “1.0” on the remote repo. To synchronise/update your local repo with the remote repo simply right click the folder and select “SVN update“.
That’s all there is to it!
Now you have successfully uploaded your plugin to the wordpress.org repository and currently your local windows folders and the remote repository folders are in synch.
So in future when you make some new changes to your plugin which you want to release to the public, just do the following:
- Make any changes to your code by editing and saving the appropriate files in the trunk folder and performing an SVN commit as in step 6.
- Then set latest version to 1.1 or whatever by following steps 8 and 9.
 Affiliate Web Designers says
January 28, 2015 at 3:02 amThanks – perfect clarity along with the photos to explain the process. The only thing missing is information as to how quickly your new plugin will appear in the WordPress plugin search results – the answer, as I just found out, is immediately!
Appearing directly in Google will take another few days I’m sure.
 Farooq Omer says
January 22, 2015 at 8:08 pmVery simple and helpful post, I am going to upload my first plugin WHMCS-Geek on WordPress today.
 copiercoller says
January 14, 2015 at 5:54 amI need to thank you about this post, even wptuts or others well know wordpress site are not so clear!!i ‘m a french developper (junior) and i have my tutorail website, and i made a similar tutorial , trying to be as clear as yours!!many thanks, because thanks to you, i understood how to put my plugin on the repository!!!!
 Danny says
August 26, 2014 at 4:18 amThank you so much for this detailed post. The screenshots really made it easy to follow.
 Rupesh says
June 1, 2014 at 4:36 pmthanx for this tut..
i have followed step as stated above..how much time it ll take to get live on wordpress.org
 peter says
June 5, 2014 at 11:15 amIt can take anywhere from a day to a few days because they have to review your code.
Cheers,
Peter
 Danny says
August 28, 2014 at 3:09 amThanks a lot Peter!!! This was very well documented on how to upload plugins.
 Rod says
April 21, 2014 at 9:44 amBrilliant. And just when I was about to fire up the Ubuntu machine. Thank you!
 Shyam Chathuranga says
October 5, 2013 at 6:29 pmHey Peter,
Really superb tutorial which explain this whole procedure very well. Today I hosted my 1st WP Plugin on WordPress Repository. That’s because of this tutorial. Here’s the Plugin URL
>> http://wordpress.org/plugins/seo-advicer/
I have read few other tutorials and I need say those are sucking tutorials. Because all of those posts haven’t explained things in the way of beginner. Your tutorial also missing something that I experienced.
I had to type a “Message” in the TortoiseSVN for every commit I’ve done. I think that might help to other people who do this thing for the first time. Anyway your tutorial made my day truthful and it’s time to start the next project. :)
Best Wishes,
Shyam Chathuranga.
 sarankumar says
July 23, 2013 at 10:39 pmHelpful post.Thank you so much for your time.
 Alex Vorn says
July 21, 2013 at 4:11 amBut how to update the version from the download link? http://alexvorn.com/wp-content/uploads/2013/07/how_to_update_version.png
I have updated the 1.3 version but users can only download 1.0
 peter says
July 23, 2013 at 10:49 amHi Alex,
After your first submission, for all other submissions you simply have to follow steps 6, 8 and 9.
(Don’t forget when you are copying over the new files to your trunk folder that you also update your main plugin file and change the latest version number. Also you should update the readme.txt file and put an entry in the changelog section).
I hope this helps,
peter
Peter
 Alex Vorn says
July 24, 2013 at 8:01 amI could not update the trunk folder because:
TortoiseSVN is buggy, I removed the .svn folder in the root of the plugin and started from point 3.
Sometimes the program says “Please run cleanup function bla bla bla”, so if the clean up does not work the single option for me is to remove the .svn folder. The program can stuck because some folders can’t be deleated because a file from the folder is used by an application… so this is a bug 100%.
Lost some days coz of this, I just like to finish things… downloaded Unlocker application that can unlock the folder if it is used.
 Brijesh Kothari says
July 7, 2013 at 11:50 pmThanks buddy it helped a lot. I have added my plugin now.
 sameera says
June 25, 2013 at 7:07 pmThanks so much for this.
I’m a newbie who has just discovered the joy of designing wordpress plugins and this info regarding how to submit your plugin using subversion has really helped me a lot and saved me a lot of time! :)
 rohitashv says
April 1, 2013 at 7:31 pmHey I have uploaded the plugin according to your tutorial and I am able to see the files into my trunk and tags folder as told you, but how I will be able to make the plugin downloadable on wordress.org ?
 peter says
April 4, 2013 at 10:33 amYou have to firstly submit your plugin for review to the WordPress folks.
Please see this page for all you need to know about submitting a plugin to wordpress.org:
http://codex.wordpress.org/Plugin_Submission_and_Promotion
 Keely says
November 23, 2012 at 6:39 pmHi,
At Step 6 I click SVN Commit and the dialog box OK button is greyed out?
Why can’t I do this> This is the 4th tutorial page I have visited and I am tearing my hair out.
 wpsolhq says
November 26, 2012 at 10:00 amHi Keely,” do you see any files there or is it empty?
Are you right-clicking on the “trunk” folder when doing this step?
Also when you look at the remote repository “http://svn.wp-plugins.org/
 duncan says
January 12, 2014 at 2:01 pmHad been struggling with this for a few weeks. Tried hiring someone to do it but I just kept getting high price quotes and the run around. I decided to dig into how to upload my own plugins and stumbled across this. YOU ROCK!
Cheers!
Duncan
 Mattias Fjellvang says
June 18, 2012 at 8:52 pmHi there! Many thanks for the post. That is exactly what I have been looking for, for a long time!
 wpsolhq says
June 28, 2012 at 3:32 pmMy pleasure Mattias and I’m glad you found it useful :)