This plugin has been improved and is now much easier and more flexible to use. See the instructions below to learn more.
The Contact Form 7 AutoResponder Addon plugin integrates together with the Contact Form 7 plugin and allows you to automatically add subscribers to your MailChimp list after they’ve submitted one of your CF7 forms on your site.
Below are some instructions which demonstrate how easy it is to use this plugin to help grow your Mailchimp lists.
Usage Instructions
Pre-requisite:
- You will need to have the Contact Form 7 plugin installed and activated
- It is assumed that you already have a Mailchimp account with at least one list configured
Step 1: Install and activate the Contact Form 7 AutoResponder Addon
Step 2: Configure the Contact Form 7 AutoResponder Addon
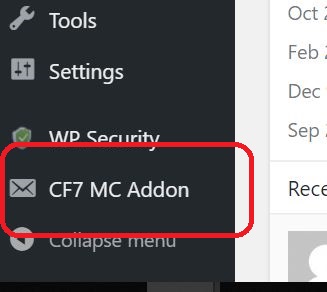
After installing and activating the plugin go to the settings page as shown below:
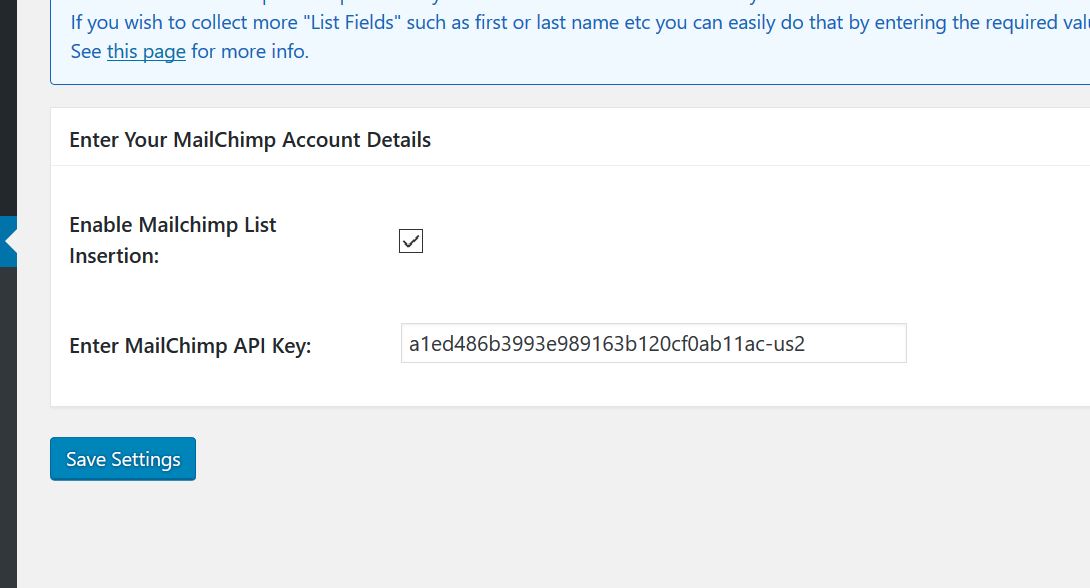
In the settings page, enable the checkbox and enter your Mailchimp account API Key.
You can obtain this key by logging into your Mailchimp account and going to:
Account >> Extras >> API Keys
After you copy your API key paste it into the settings field as shown below.
After you have configured the above settings click the “Save Settings” button.
Step 3: Check your List fields in your Mailchimp account
In order for the CF7 form to be able to submit more than just an email address to your Mailchimp list you will need to first do some simple setup steps on your form so that it can submit the relevant information to your list.
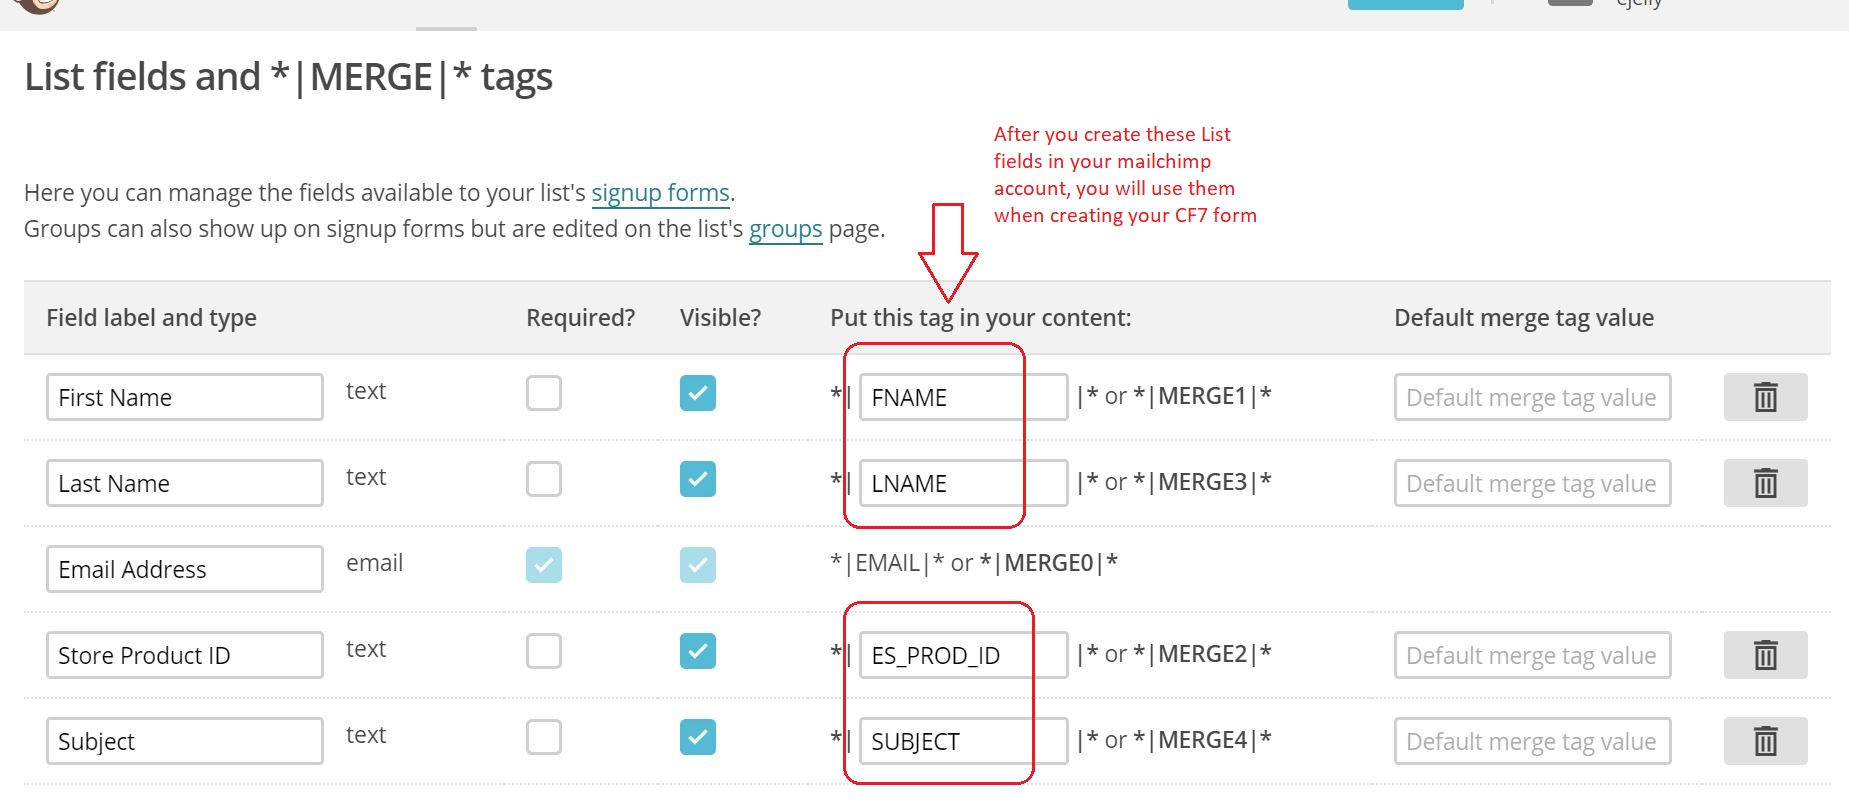
When you login to your Mailchimp account and edit your specific list and go to the Settings >> List Fields and *|Merge|* tags page you will see a list of fields which your list currently accepts. You can add or delete any fields as required. Below is an example of a list with some fields:
Add any field types you want to capture from your CF7 form and make note of the “tag” names as shown circled in red above.
(Note: the EMAIL field is the only mandatory field required by Mailchimp and this is automatically added by the system and the tag name cannot be renamed. All the other fields are optional and can be added/edited/deleted by you).
Step 4: Configure the Form fields of your CF7 form
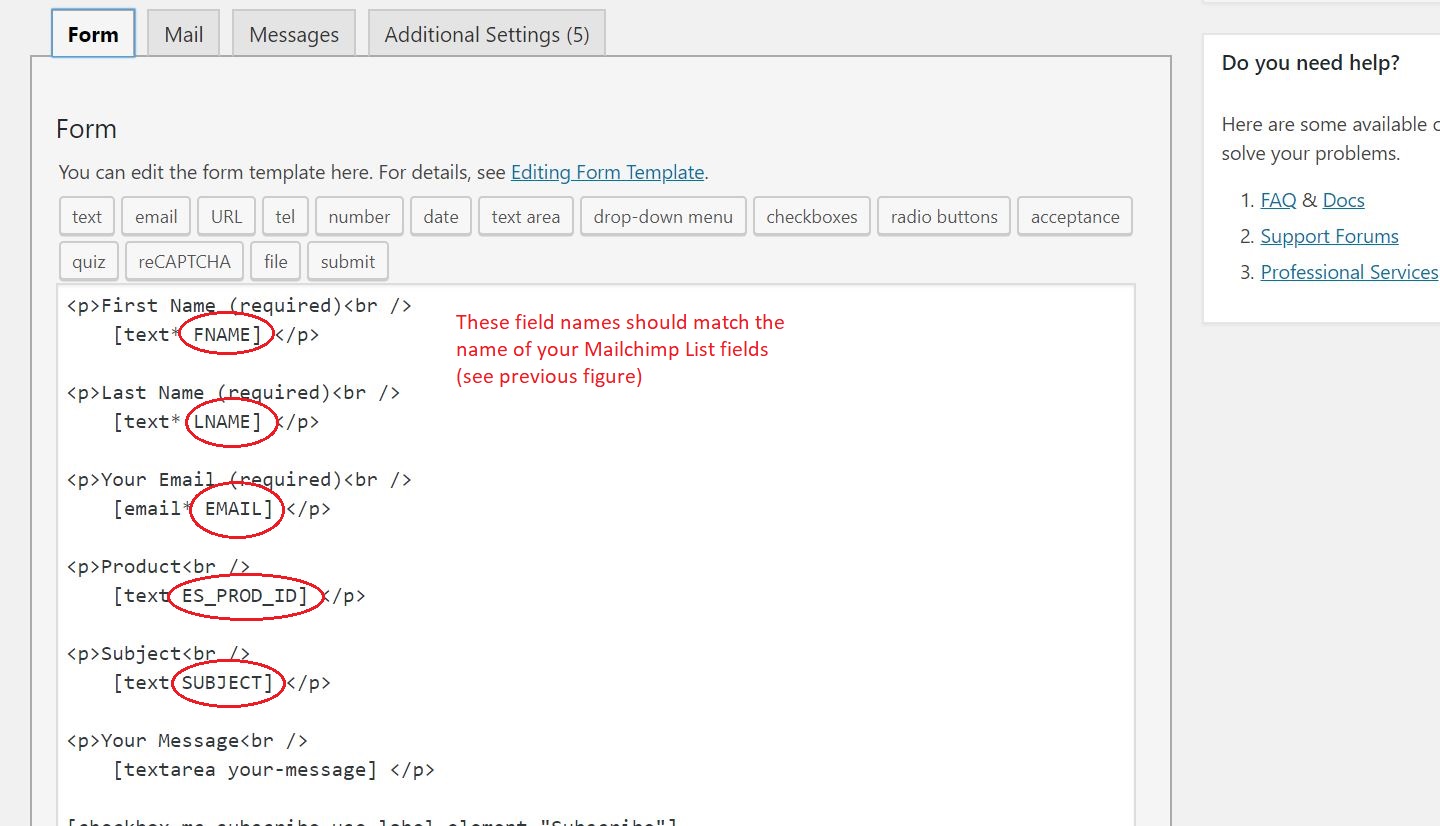
Open an existing Contact Form 7 form or create a new one and make sure that it contains fields with names which match the tag names in the previous step. See the following example:
Step 5: Add configuration to the “Additional Settings” tab of the CF7 form to allow Mailchimp list subscription
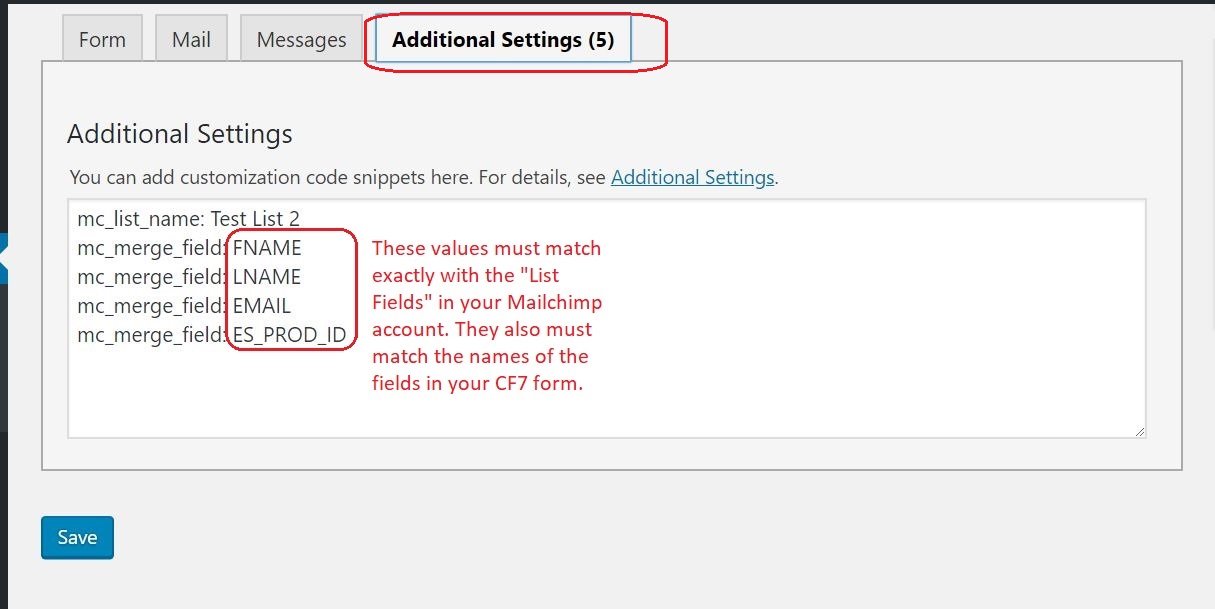
After constructing your forms fields in the previous step, click on the “Additional Settings” tab of your form and add the configuration which will activate this form so that it can subscribe a visitor to your Mailchimp list.
See the example shown below:
See below for an explanation of each of the lines in figure above:
mc_list_name: Test List 2
This line tells the plugin that you wish to subscribe whoever submits that form to the list which has the name “Test List 2”. (note: your list name will be different so make sure you enter the correct name which is case-sensitive). This line is the minimum config required in order to be able to subscribe someone to your list via the CF7 form.
Tip: if you would prefer to use your list’s ID instead of the list name you can use the “mc_list_id” parameter item in place of “mc_list_name”.
Example:
mc_list_id: d7be12d11a
To find your list’s ID see Mailchimp’s instructions:
https://mailchimp.com/help/find-your-list-id/
mc_merge_field: FNAME
mc_merge_field: LNAME
mc_merge_field: EMAIL
mc_merge_field: ES_PROD_ID
The above lines simply tell this plugin that you wish to submit the information entered into these fields from your form, to your Mailchimp list. You can add or delete as many “mc_merge_field” items as you wish depending on what sort of information you wish to collect in your list.
Just remember that these tag names must match the names in your form (see step 4) and also the List field names in your Mailchimp account for your list (see step 3).
The above instructions demonstrate the basic way to use this plugin to help grow your Mailchimp lists via the Contact Form 7 plugin forms.
The flexibility of this plugin allows you to have as many CF7 forms and Mailchimp lists as you wish. All you need to do is make sure that specific CF7 form has the correct configuration details as explained above and you are good to go!
Useful Tip:
If you wish to momentarily disable a certain CF7 form from subscribing people to Mailchimp you simply enter the following line in the “Additional Settings” tab of your CF7 form:
mc_skip: true
(Doing the above will save you from deleting your existing config which you entered in the “Additional Settings” tab)
Other configuration items
In addition the configuration items you added inside the CF7 “Additional Settings” tab, you can also use the following to add some extra functionality:
mc_disable_double_opt: 1
This allows you to switch off the double-opt-in email from being sent by Mailchimp to your subscriber. In other words this setting will automatically subscribe the visitor to your list without asking them to “opt-in”. (You can also set this inside your mailchimp account via the list settings)
Giving your visitors the option to subscribe via a checkbox
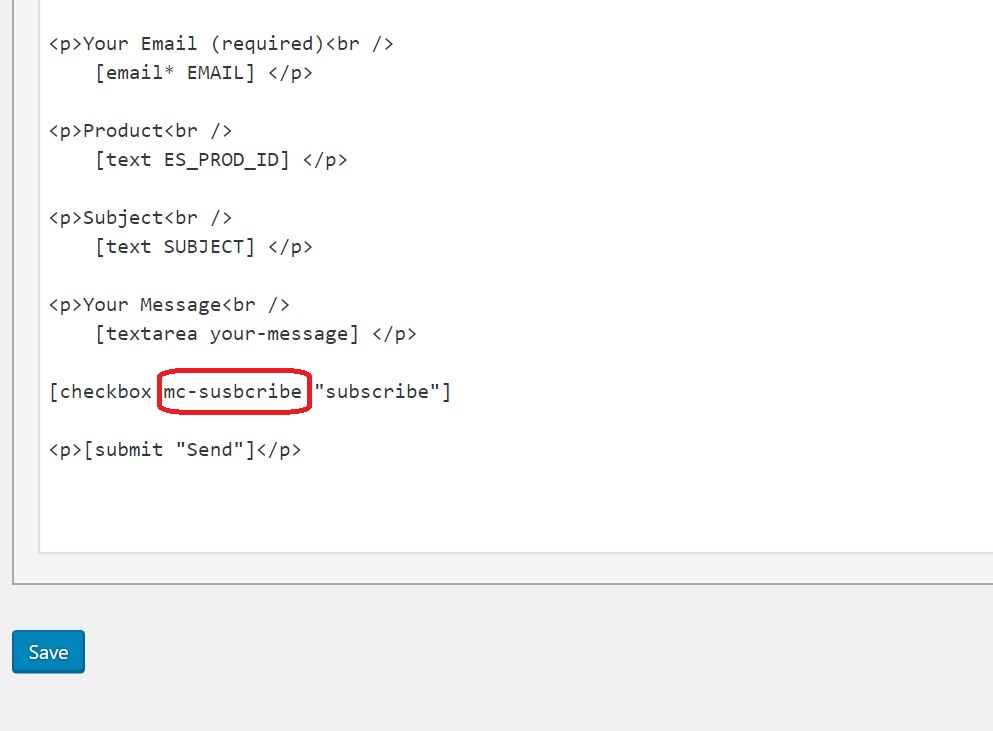
Instead of automatically adding a submitter of your CF7 form to your Mailchimp list, you can add a special checkbox in the form where you can ask your visitors whether they want to be subscribed to your mailing list.
In order for this plugin to recognize the checkbox it needs to have the name field set to “mc-subscribe“. (see example in the figure below)
