The Contact Form 7 AutoResponder Addon plugin allows you to automatically add people to your MailChimp list after they’ve sent you a message using your CF7 form.
This useful little plugin currently supports addition of subscribers to MailChimp lists.
In upcoming versions, there will be other AutoResponders added to the functionality subject to feedback and demand.
The plugin is easy to use and it uses the submitted email and name fields from the basic CF7 form to insert these details into your MailChimp list.
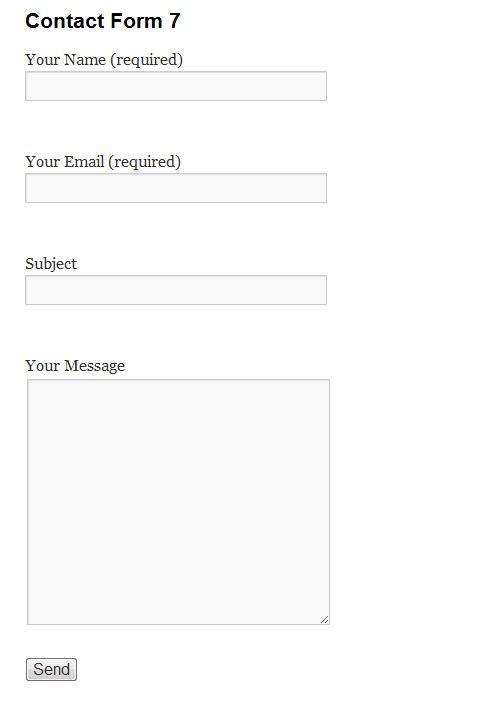
This plugin works for the default CF7 form which has the following fields:

The plugin will read the submitted values for the “Your Name” and “Your Email” fields in the above default CF7 form. Note that these fields have the “name” parameter set to:
“your-name”
“your-email“.
If you wanted to use a slightly more customized form whereby instead of using just a single name field you wanted to use “first name” and “last name” in addition to the email field, then this plugin will also read these fields as long as you use the following “name” settings for these fields:
“your-first-name”
“your-last-name”
“your-email”
You can also add a checkbox to your CF7 form with the “name” parameter set to “mc-subscribe” with a label saying something like “Subscribe Me To Your List”.
This will then give your visitors the option of whether they want to subscribe to your list or newsletter or whatever, after submitting the CF7 form.
If this checkbox is present and it is enabled and provided the “Enable Mailchimp List Insertion” is also enabled, the plugin will allow the subscription to occur, otherwise it will not.
If by default you do not have the “mc-subscribe” checkbox in your form and the “Enable Mailchimp List Insertion” is also enabled, then subscription will occur by default.
Download the CF7 AutoResponder Addon Plugin:
Version: 1.2
Requires: 3.1
Tested up to: 3.4.1
Price: FREE
Installing the CF7 AutoResponder Addon Plugin
- FTP the
cf7-autoresponder-addonfolder to the/wp-content/plugins/directory, OR, alternatively, upload thecf7-autoresponder-addon.zipfile from thePlugins->Add Newpage in the WordPress administration panel. - Activate the cf7-autoresponder-addon plugin through the ‘Plugins’ menu in the WordPress administration panel.
Using The CF7 AutoResponder Addon Plugin
Pre-requisites:
- You must have Contact Form 7 plugin installed and activated
- The forms which you want to use to add people to your MC list have been configured via the Contact Form 7 plugin.
- Your CF7 forms have been configured with the correct naming conventions for the name field, eg:
“your-name” (if you’re using a single name field)
“your-first-name” (if you’re using a first name field)
“your-last-name” (if you’re using a last name field)
“mc-subscribe” (if you want to give your visitors the option to choose to subscribe to your list using a checkbox)
1. CF7 AutoResponder Addon Config Page
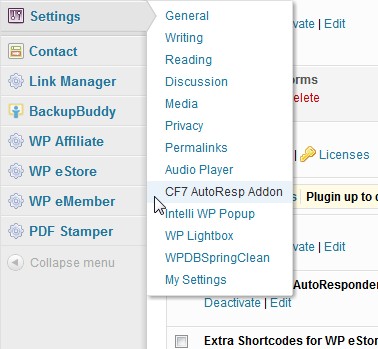
After you’ve installed and activated the CF7 AutoResponder Addon plugin, go to the Settings menu and choose CF7 AutoResp Addon as shown below:

2. Configuration Settings
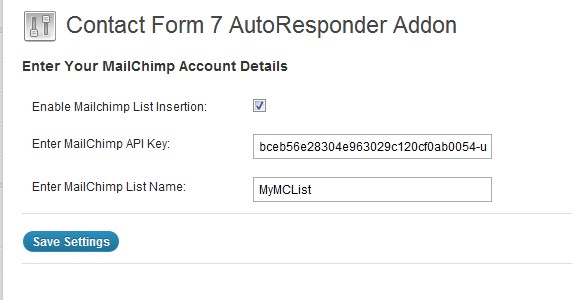
Configure the plugin by entering the following settings (see screenshot below):
- Enable the check-box called “Enable Mailchimp List Insertion”. This will activate the automatic insertion of people to your MailChimp list when they send you a message via the Contact Form 7.
(Note: if you would like to temporarily disable the adding of people to your list, simply uncheck the flag) - Enter your MailChimp API key
Note: Your MailChimp API Key can be obtained when you log into your MailChimp account. It can be found under the “Account” tab. By default the API Key is not active so make sure you activate it. - Enter your MailChimp list name.
Note: You would have specified this in your MailChimp account when you created the list. Ensure that you enter the correct name because if you mispell the name or provide an incorrect list name, the CF7 AutoResp Addon plugin will not be able to add your client to your list.

And that’s it! Now whenever anyone leaves a message on your site using the Contact Form 7, they will automatically be added to your MailChimp list, OR, you can give your visitors the choice to subscribe by using the checkbox described in the pre-requisites section.
Please be aware that in order for someone to be added to your list, they will firstly need to confirm the subscription by clicking on the appropriate link in the “confirmation” email which is sent by MailChimp.
Using different list names based on the CF7 form
Normally people are subscribed to the global AWeber, GetResponse or MailChimp list names which are specified in the main settings of this plugin.
However if for example you have more than 1 list in your AWeber or GetResponse or MailChimp accounts and you wish to add people the different lists, you can do so with this plugin based on the form you are using.
For example if you have 3 different CF7 forms on your site, you can use each form to add people to 3 separate lists whereby each CF7 form can be configured to specify an autoresponder list name.
To do this you simply need to modify the submit button code of the relevant CF7 form by adding an extra parameter.
For example a typical submit button code for a CF7 form looks like the following:
[submit “Send”]
Now if you wanted to use that particular CF7 form to add someone to a different list from the one specified in the global settings of this addon, you simply need to modify the submit code as follows for the CF7 form you are interested in:
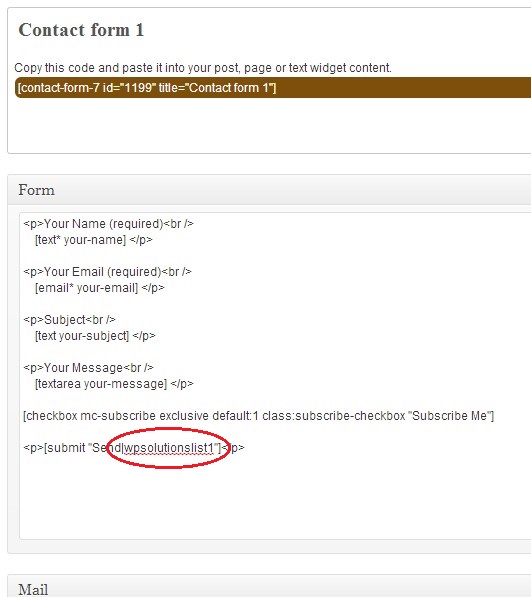
[submit “Send|wpsolutionslist1“]
Note that we’ve simply added a “pipe” character “|” followed by the list name which in our example is called “wpsolutionslist1” to the name of the button.
Here’s an actual example of a CF7 form config where we want to subscribe people to a list called “wpsolutionslist1”:
The above method will allow you to subscribe people to specific list names based on the CF7 form they are using. This means you can conveniently insert people to more than one list depending on the form they fill in.
How to insert custom tags and field values to your mailchimp list from the CF7 form
By default this plugin will submit the values for the following field names into your mailchimp list:
your-email
your-name (OR, your-first-name and your-last-name)
Sometimes you may want to add more information to your mailchimp list in addition to email and names.
If you wish to insert more tags and their values into your list you can do so by doing the following:
- Step 1 – Log into your mailchimp account and go to your list settings and create your new fields in the “List fields and MERGE tags” section. (Take note of the merge tag value (NOT the field name) from mailchimp, eg, CITY)
- Step 2 – In your Contact Form 7 settings add a new field which will represent the merge tag you want to insert into mailchimp.
Example: you might add a text field to collect the “City” name from the CF7 form. When creating this field via the CF7 settings, set its “Name” value as follows:
MCTAG-CITY
The above name consists of two parts: a prefix MCTAG- and the actual merge var tag name which you got from your mailchimp account in step 1, ie, “CITY”.
IMPORTANT: You MUST follow the above format when adding additional fields in which you want to insert into your mailchimp list.
The fieldname must always have the MCTAG- prefix followed by the merge var tag value.


 Henry says
March 26, 2015 at 1:05 pmHello,
2 questions for this super useful plug-in…
1) Is it possible to send group information to mail chimp? I have 2 independent WP sites that have CF7 forms. I want emails to get added to the same list within MC. in MC I have a hidden group that tells me which website the info came from. do you have something similar to “mc4wp” plugin:
2) Below is my code in CF7 forms. Behind scenes all is working. I get CF7 email and autoresponder addon gets the info into my MC account as expected. However, on WP site the “hour glass” processing never goes off next to send button. I dont get the success message. it appears unsent to user.
Your Location
[checkbox mc-subscribe exclusive default:1 class:subscribe-checkbox “Subscribe to Rosa’s Newsletter”]
[submit “Send”